Examine This Report on Landscape Light Installation
Wiki Article
4 Simple Techniques For Landscape Light Installation
Table of ContentsLandscape Light Installation Things To Know Before You Get ThisLandscape Light Installation Can Be Fun For AnyoneThe Definitive Guide to Landscape Light InstallationIndicators on Landscape Light Installation You Should KnowLandscape Light Installation Fundamentals ExplainedGetting My Landscape Light Installation To Work
Without any major electric experience I went on the quest for simple to set up low voltage landscape lights. Reduced voltage landscape lights are powered with a transformer, that attaches to the cable, that reduces the voltage from regular 120 volts to 12 volts.I constantly assumed I 'd need to dig ditches and run all type of cords but the low voltage outside limelights that I located were so simple to mount. Thirty minutes was all it required to provide our cottage an enchanting glow in the evening. I got 2 of these light sets for the front of our house.
I possibly could have gotten by with less lights but the 4 light collection was the tiniest one available. After I tightened down my selections I looked for lights that had terrific testimonials.
As soon as I obtained them and laid the lights out I knew the 3 and 3 arrangement would not work. Even though I obtained a great deal of wire with the set, I would have had to dig under the pathway in order to conceal the cable.
The smart Trick of Landscape Light Installation That Nobody is Talking About
 Keep in mind, I wanted this to be easy with no excavating and no rewiring. While I identified a solution I just installed all 6 by the guest room to see how they would look. A quick word of care. Although we are just plugging in lights it's essential to be secure and make use of care when collaborating with electrical power.
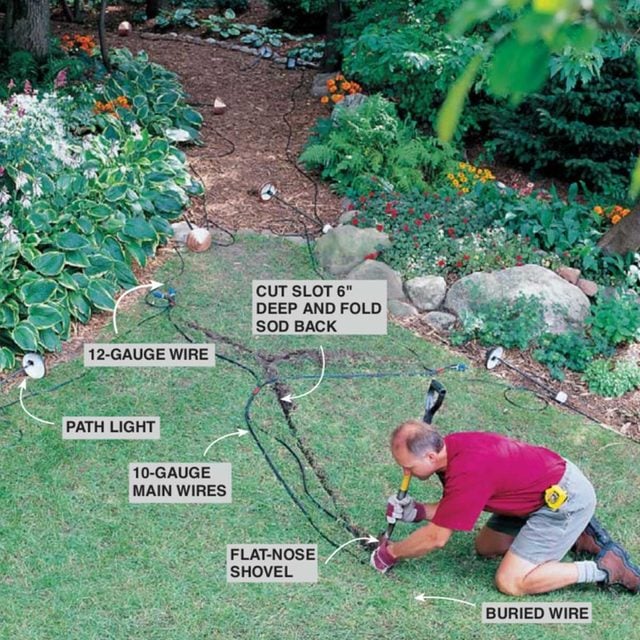
Currently the landscape lights transform on and off automatically at set times each night. When the sun collection and my lights turned on I went outside and modified them to strike the front of the house.
Like I stated, the smallest set I could obtain was 4 lights to ensure that's what I ordered. Once they arrived I installed them following the same steps as the very first set of lights. Truly, an incredibly straightforward method to include an attractive radiance to your home. I must have done it 5 years ago.
Fascination About Landscape Light Installation
He would not confess that I was appropriate butI was (Landscape Light Installation).# 10 gauge outside wire # 12 gauge outside cord 1-1/2 in. x 12-in. PVC pipe 1-1/2-in. PVC cap with -in. female string -in. copper pipe For each ground light: 1-1/2-in. PVC coupler with -in. tee for cable opening Lights One box of weatherproof cable ports Transformer Two -in. sweat-to string copper adapters Extension ladder Garden rake Level Posthole digger Safety and security glasses Voltage tester Cable stripper/cutter Wrench setvolt me Volt meter A garden spade Aluminum outdoor tents risks.
Set up lights where they will not be conveniently harmed by plows or shovels. Remember, too, that the plants you brighten will experience seasonal modifications. Not all plants have to be evergreens, some plants such as hydrangea, dogwoods and sumac are intriguing click over here now illuminated even when leafless. When you have your materials, your devices and your plan, it's time to call 811.
It's a totally free solution and you'll avoid unsafe and expensive shocks. Usage 10-gauge wire for the primary lines from the transformer to where the lights start, then change to 12-gauge wire in between the lights. To bury the cords where they go across the yard, make use of a flat-nosed shovel to reduce a slot and layer back the turf.
Landscape Light Installation Things To Know Before You Get This
Utilizing the PVC pipeline, construct and hide a footer that will house the cord connections and support your post expansions (advised to be made of 1/2- inch copper pipe). Link the cords with weatherproof cord connectors. These wire adapters have a shield under and a ball of sealer inside that make them weatherproof.
Having a strong plan relating to landscape illumination is more important than you might visualize. Appropriately illuminating areas in your yard and your home throughout the evening not just gives an amazing sight of your house yet can also prevent potential mischief-makers or robbers. If you're not sure where to begin with landscape design lights, you remain in the best area! Right here is our handy outside lights overview, where we will walk through where to position landscape lights, what kinds of lights to use, and exactly how to use light for the very best result.
Landscape Light Installation Can Be Fun For Anyone

It's a totally free solution and you'll stay clear of dangerous and costly shocks. Usage 10-gauge wire for the major lines from the transformer to where the lights begin, after that change to 12-gauge cord in between the lights. To hide the wires where they cross the yard, use a flat-nosed Continued shovel to reduce a port and layer back the turf.
Considering that the transformer will always be plugged in, you should replace the basic electrical outlet cover with an in-use weatherproof cover, readily available at most significant home improvement facilities and hardware stores. The ground risks that come with the majority of upright lighting components are not solid enough (or go deep adequate) to maintain them good and straight over time with altering dirt conditions, disintegration, and so on.
Making use of the PVC pipe, construct and bury a footer that will house the wire connections and support your pole expansions (recommended to be made of 1/2- inch copper pipe). Connect the wires with weatherproof cable connectors. These wire ports have a shield under next and a blob of sealant inside that make them weatherproof.
Indicators on Landscape Light Installation You Need To Know
If you're not certain where to begin with landscaping lights, you're in the ideal location! Right here is our useful outside lighting guide, where we will certainly walk through where to position landscape lighting, what kinds of lights to utilize, and how to utilize light for the ideal effect - Landscape Light Installation.Report this wiki page